Table of Content
1. Abstract
2. Introduction
3.1 Requirements
3.2 Setup Steps
3.3 Overview of System Workflow
3.4 Visual Perception Module
3.4.1 Screenshot Capture
3.4.2 OWLv2 Detection
3.4.3 Fallback Detection with Qwen-VL
3.5 Action Execution Module
3.5.1 Mouse Movement and Click
3.5.2 Typing and Submitting a Prompt
3.6 Two-Phase Testing Design
4. System Explanation
5. Results
6. Discussion
7. Future Work
8. Conclusion
9. Mermaid Diagram Source Code
10. References
About the Author
Cursor UI Agent (CUA): AI Agent to Operate Cursor Autonomously
Simulating Human Interaction with Desktop Interfaces Using Computer Vision Models

1. Abstract
This project introduces the Cursor UI Agent (CUA), a Python-based AI Agent that can operate Cursor as a human user. Since they are no APIs or SDK for Cursor, the CUA "sees" the screen like a person would, detects the location of the chat input box using visual models (OWLv2 and Qwen-VL), and then simulates mouse and keyboard actions to interact with the application. This allows it to click on the input field, paste a prompt, and press enter—just like a real user. This approach enables automation even when public APIs are unavailable, opening up new possibilities for integrating AI platforms into broader projects.
2. Introduction
Many AI tools—such as Cursor—offer powerful capabilities, but they often lack public APIs or impose limits on automated use. This creates challenges for developers who want to integrate these tools into their own workflows or test them at scale. The Cursor UI Agent (CUA) was created to address this issue. Rather than communicating with these tools through code or APIs, the CUA mimics how a human would interact with the user interface directly on screen.
The core idea is simple: treat the AI application like a black box. The CUA takes a screenshot of the current screen, uses computer vision to detect the chat input box, and then automates the steps a person would take—moving the mouse, clicking, typing or pasting text, and hitting enter. This makes it possible to automate AI tools even when API access is restricted. The project uses object detection models like OWLv2 and Qwen-VL to visually understand the screen and act accordingly.
3. Methods
3.1 Requirements
- Python 3.9+
- pyautogui for mouse and keyboard control
- Internet access for using cloud-based models
- API keys for:
- OWLv2 via Hugging Face
Qwen-VL via DeepInfra
3.2 Setup Steps
- Open Cursor: Make sure you're logged in to a chat-based AI tool.
- Open Chat Interface: Make sure the input box is fully visible.
- Keep Layout Steady: Don’t scroll, resize, or switch tabs while running the agent.
- Prepare the Script: Your script should:
- Take a screenshot
- Run OWLv2 (fallback to Qwen-VL if needed)
- Move the mouse and click
- Paste and submit prompts
Run the Script: Execute your Python script to launch the agent
3.3 Overview of System Workflow
The CUA is developed in Python and divided into separate modules for clarity and modular testing. The system mimics a human using visual inputs to locate the chat input box, move the mouse, click the box, type a prompt, and press Enter. The flow is explained in two stages: detection and interaction, and two-phase testing.
3.4 Visual Perception Module
3.4.1 Screenshot Capture
The process begins by capturing a screenshot of the user's current screen using Python’s PIL (Pillow) library. This screenshot becomes the input for the object detection model. The agent does not have prior knowledge of the page layout — it acts solely based on what is visually seen on screen, just like a person.
3.4.2 OWLv2 Detection
The main computer vision task is zero-shot object detection: identifying the location of the “chat input box” without having trained on that exact image.
- Model Used: OWLv2, hosted on Hugging Face
- Method: We ask OWLv2 to detect an object labeled as "chat input box"
- Output: The model returns bounding box coordinates
Before continuing, the system checks if the detected bounding box meets basic sanity criteria, such as minimum width/height and position not being in the top-left corner (a common false positive). This helps ensure reliable interaction before proceeding. If the coordinates are suspicious, detection is considered a failure. This step is crucial because it allows the agent to operate on any screen, even unfamiliar ones, by just using a description.
3.4.3 Fallback Detection with Qwen-VL
If OWLv2 fails or returns invalid coordinates, the agent uses a second model — Qwen-VL — via API access on DeepInfra.
- Task: Image-guided detection
- Inputs:
- Full screenshot of the current screen
A smaller sample image of a chat input box
- Full screenshot of the current screen
- Output: Bounding box coordinates if the chat box is found
This approach helps recover when zero-shot detection fails. For example, some websites may have unique layouts that OWLv2 struggles to understand. Qwen-VL provides a second chance by comparing visual similarities between two images
3.5 Action Execution Module
3.5.1 Mouse Movement and Click
After getting valid coordinates, the system uses them to calculate the center point of the detected box. The pyautogui library is then used to:
- Move the mouse to that center point
- Click the box to activate it
Clicking the center maximizes the chance that the cursor lands in the right place, even if the bounding box isn't perfectly shaped.
3.5.2 Typing and Submitting a Prompt
The next step simulates a human typing into the input field:
- The agent pastes a prewritten prompt
- Then it presses the Enter key
This completes a full interaction cycle without needing backend APIs.
3.6 Two-Phase Testing Design
To make sure the system works reliably, it runs in two stages:
Phase 1 – Basic Test
- Prompt Used: "Create an HTML page that says 'Hello World'"
- Goal: Sanity check. Confirm that:
- The input box was detected
- Mouse movement and click succeeded
- The prompt was successfully submitted
This phase ensures that the core interaction is working before proceeding to a more complex task.
Phase 2 – Real-World Prompt
This phase starts only if Phase 1 succeeds, adding reliability to the process.
- Prompt Used: "Generate a high-level list of pages/screens for a typical web application. Provide the output in Markdown format using headings and bullet points."
Goal: Test how the system handles real-world prompt interactions, such as structured output, longer text, and Markdown formatting.
4. System Explanation
Below is a detailed walkthrough of the visual interaction process:
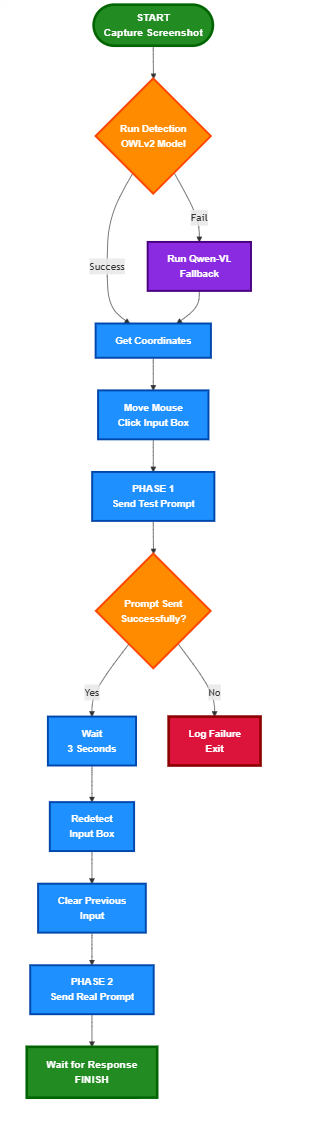
- Capture Screenshot
A full-screen image is taken to be analyzed. No layout assumptions are made — the agent relies purely on what it can "see." - Run Detection Model
OWLv2 is tried first to locate the chat input box. If that fails, Qwen-VL is used with a visual reference image. - Get Coordinates
Bounding box coordinates are returned. These are used to calculate the box's center. - Move and Click
The system moves the mouse to the center and clicks the box to activate it. - Paste and Send Prompt (Phase 1)
A short prompt is pasted and submitted. This helps confirm that detection and input simulation are functional. - Wait and Trigger Phase 2
A short 3-second pause is included. This gives time for the screen to respond, especially if the AI assistant shows animations or refreshes. - Redetect Input Box
A second round of detection ensures the chat input box hasn’t moved. Some apps shift elements after submission, so this avoids clicking in the wrong place. - Clear Previous Input
All text in the input field is selected and deleted. This avoids mixing prompts or generating confusing results. - Paste and Send Real Prompt (Phase 2)
A longer prompt is submitted. This prompt simulates a typical user query to evaluate the full system behavior. - Wait for AI Response
A short delay is included to allow the assistant to respond. In future versions, the screen output can be read using OCR.
This entire process — from image detection to prompt submission — mimics how a human would interact visually and manually with an AI interface. It removes the need for APIs and relies only on what’s seen on-screen. Each phase adds confidence that the system is working before progressing further.
5. Results
The OWLv2 model successfully identified the chat box in approximately 85% of cases. In instances where OWLv2 failed, Qwen-VL often provided a successful alternative, elevating the overall success rate to roughly 95%. Occasional inaccuracies in clicking occurred due to screen clutter or alignment issues.
Following the identification of the chat box, mouse and keyboard actions performed seamlessly. The primary challenge was the precise timing adjustments between steps to account for variations in computer processing speed and website load times. Factors such as screen layout and resolution also had a minor impact on accuracy.
6. Discussion
The project ran into a few common problems in UI automation. Sometimes the detection box wasn’t perfect, so the mouse didn’t click in the right spot. In other cases, the chat input box moved after a message was sent, making the original detection useless. To solve these problems, the system was updated to double-check the box’s location after each prompt. A short pause was also added to let the screen settle before moving on. These simple fixes helped make the agent more reliable.
Even though this project was focused on Cursor, the same method could work for other tools too. For example, this type of visual agent could help people with disabilities control software or could be used in software testing by simulating how a real person would use a program. It could also act as a bridge between AI models and tools that don’t have APIs.
7. Future Work
While CUA demonstrates proof-of-concept automation using visual perception and basic control flows, more robust solutions are better handled by full-fledged desktop agents like Simular's Agent S2. Future iterations should explore migrating toward such architectures to gain the following:
- Native extraction of AI responses using UI-level access instead of OCR.
- Built-in retry mechanisms that adapt automatically to failures or screen changes.
- Multi-turn workflows with integrated agentic memory and planning capabilities.
- Scrolling and chat history extraction, enabling context-aware prompting.
- Cross-application automation, reducing reliance on fragile visual models.
Integrating CUA logic into a Simular-based foundation can retain its lightweight benefits while gaining scalability and resilience.
8. Conclusion
The Cursor UI Agent (CUA) shows that it’s possible to automate tools like ChatGPT using only what’s visible on screen—no need for API access. By combining object detection models with mouse and keyboard simulation, CUA acts like a human user to interact with the interface. This makes it useful not just for Cursor, but also for other apps where normal automation methods aren’t available.
9. Mermaid Diagram Source Code
The Mermaid code below represents the full visual process described in the System Explanation section. This code can be used to regenerate or modify the flowchart in supported Markdown editors or diagram tools.
flowchart TD
    Start([START<br/>Capture Screenshot])
    Start --> Detect{Run Detection<br/>OWLv2 Model}
    Detect -->|Success| GetCoords[Get Coordinates]
    Detect -->|Fail| Fallback[Run Qwen-VL<br/>Fallback]
    Fallback --> GetCoords
    GetCoords --> Click[Move Mouse<br/>Click Input Box]
    Click --> Phase1[PHASE 1<br/>Send Test Prompt]
    Phase1 --> SentCheck{Prompt Sent<br/>Successfully?}
    SentCheck -->|Yes| Wait[Wait<br/>3 Seconds]
    SentCheck -->|No| Fail[Log Failure<br/>Exit]
    Wait --> Redetect[Redetect<br/>Input Box]
    Redetect --> Clear[Clear Previous<br/>Input]
    Clear --> Phase2[PHASE 2<br/>Send Real Prompt]
    Phase2 --> End[Wait for Response<br/>FINISH]

    classDef startEnd fill:#228B22,stroke:#006400,stroke-width:4px,color:#FFFFFF,font-weight:bold,font-size:16px,font-family:Arial
    classDef process fill:#1E90FF,stroke:#0047AB,stroke-width:3px,color:#FFFFFF,font-weight:bold,font-size:15px,font-family:Arial
    classDef decision fill:#FF8C00,stroke:#FF4500,stroke-width:3px,color:#FFFFFF,font-weight:bold,font-size:15px,font-family:Arial
    classDef failure fill:#DC143C,stroke:#8B0000,stroke-width:4px,color:#FFFFFF,font-weight:bold,font-size:15px,font-family:Arial
    classDef fallback fill:#8A2BE2,stroke:#4B0082,stroke-width:3px,color:#FFFFFF,font-weight:bold,font-size:15px,font-family:Arial

    class Start,End startEnd
    class GetCoords,Click,Phase1,Wait,Redetect,Clear,Phase2 process
    class Detect,SentCheck decision
    class Fail failure
    class Fallback fallback
10. References
- Hugging Face OWLv2 Model – https://huggingface.co/google/owlv2-base-patch16-ensemble
- DeepInfra Qwen-VL – https://deepinfra.com
- PyAutoGUI Documentation – https://pyautogui.readthedocs.io
- Transformers Library – https://huggingface.co/transformers
- Python Pillow Library (PIL) – https://python-pillow.org
#CursorUIAgent #VisualAgents #OWLv2 #PyAutoGUI #ZeroShotDetection #AIIntegration #UIAutomation #AgenticInterfaces
About the Author
Dr. Rohit Aggarwal is a professor, AI researcher and practitioner. His research focuses on two complementary themes: how AI can augment human decision-making by improving learning, skill development, and productivity, and how humans can augment AI by embedding tacit knowledge and contextual insight to make systems more transparent, explainable, and aligned with human preferences. He has done AI consulting for many startups, SMEs and public listed companies. He has helped many companies integrate AI-based workflow automations across functional units, and developed conversational AI interfaces that enable users to interact with systems through natural dialogue.